

The Solray Batten has been designed to replace traditional tubes AND their fittings. Versatile and easy to install via various surface mount or cable options, the Solray is ideal for a wide range of applications.
• 4 selectable output settings
• 3 selectable colour temperature options
• Self test quick ‘Plug ‘n’ Play’ emergency pack
• Microwave on/off and DALI-2 solutions available
• Up to 193lm/W efficiency
• 5 year warranty
APPLICATIONS
Offices, schools, corridors, medical centres.
Also available in this range
Table Header
Lorem ipsum dolor sit amet, consectetur adipiscing elit.
All Novah products
Filters
Sort by
Thank you! Your submission has been received!
Oops! Something went wrong while submitting the form.
Tag
Showing 0 of 100


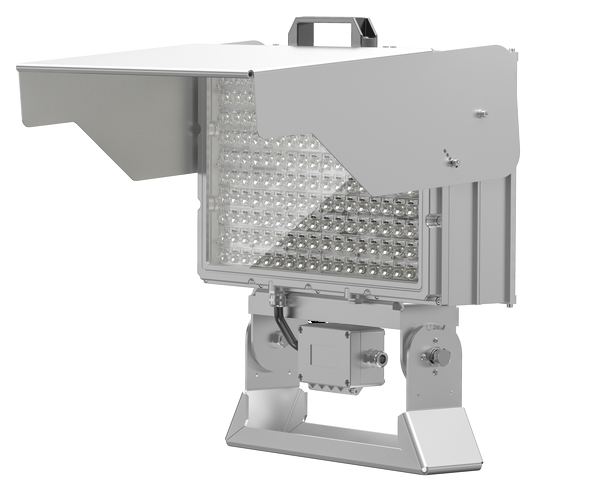
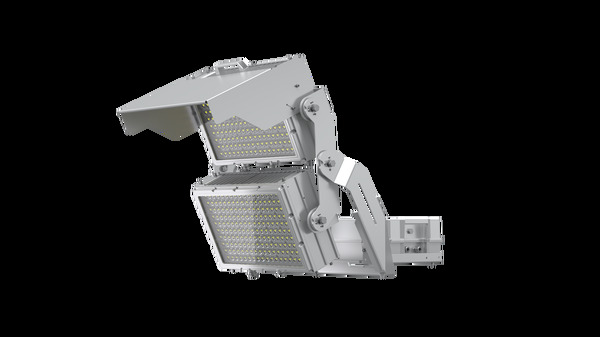
Apollo 1200W Sports Flood with Asymmetric Beam
Asymmetric Floodlights
Industrial
90000
1200W
5000K
No
No
No
C


Gemini Select 90/113/137/161W Rack Beam
Low Bays
90-161W
4000K
DALI (Optional)
Emergency (Optional)
PIR (Optional)
Standard
C


Sirius V High Bay (60°) 90-150W 220lm/W Selectable Outputs + Self-test Emergency
High Bays
Industrial
32250
90-150W
5000K
Emergency
Microwave ON/OFF
PIR
A
Sirius V High Bay (60°) 90-150W 220lm/W Selectable Outputs + Emergency
High Bays
Industrial
32250
90-150W
5000K
Emergency
Microwave ON/OFF
PIR
A
Sirius V Low Bay (90°) 90-150W 220lm/W Selectable Outputs + Self-test Emergency
High Bay/Low Bay - industrial
Industrial
32250
90-150W
5000K
Emergency
Microwave ON/OFF
PIR
A
Sirius V Low Bay (90°) 90-150W 220lm/W Selectable Outputs + Emergency
High Bay/Low Bay - industrial
Industrial
32250
90-150W
5000K
Emergency
Microwave ON/OFF
PIR
A

Barracuda IV 6ft 64W Non-Corrosive 3CCT DALI 2.0
Linear Batten (Industrial)
Industrial
10100
64W
4000/5000/6500K
DALI
Emergency (Optional)
Standard
C
Barracuda IV 6ft 36-64W CCT Non-Corrosive Non-Corrosive with Corridor Function
Linear Batten (Industrial)
Industrial
10100
36-64W
4000/5000/6500K
No
Emergency (Optional)
Standard
C
Barracuda IV 6ft 36-64W CCT Non-Corrosive Non-Corrosive + Self Test Emergency
Linear Batten (Industrial)
Industrial
10100
36-64W
4000/5000/6500K
No
Emergency
Standard
C
Barracuda IV 5ft High Output 55W 3CCT Non-Corrosive + DALI 2.0
Linear Batten (Industrial)
Industrial
8900
55W
4000/5000/6500K
DALI
Emergency (Optional)
Standard
C
Barracuda IV 5ft High Output 31-55W 3CCT Non-Corrosive with Corridor Function
Linear Batten (Industrial)
Industrial
8900
31-55W
4000/5000/6500K
No
Emergency (Optional)
Standard
C
Barracuda IV 4ft 36W 3CCT Non-Corrosive DALI 2.0
Linear Batten (Industrial)
Industrial
5800
36W
4000/5000/6500K
DALI
Emergency (Optional)
Standard
C
Barracuda IV 4ft 21-36W 3CCT Non-Corrosive with Corridor Function
Linear Batten (Industrial)
Industrial
5800
21-36W
4000/5000/6500K
No
Emergency (Optional)
Standard
C
Barracuda IV 2ft 10-17W 3CCT Non-Corrosive + DALI 2.0
Linear Batten (Industrial)
Industrial
2500
17W
4000/5000/6500K
DALI
Standard
C

Solray Select III 6ft LED Batten 35-62W 3CCT with Self-Test Emergency + Microwave Sensor
Linear Batten (commercial/education)
9700
35-62W
3CCT (3/4/5700K)
Emergency
Microwave ON/OFF
C
Solray Select III 6ft LED Batten 35-62W 3CCT with Self-Test Emergency
Linear Batten (commercial/education)
9700
35-62W
3CCT (3/4/5700K)
Emergency
C

Solray Select III 5ft High Output LED Batten 30-53W 3CCT with Self-Test Emergency + MW Sensor ON/OFF
Linear Batten (commercial/education)
9400
30-53W
3CCT (3/4/5700K)
Emergency
Microwave ON/OFF
C
Solray Select III 5ft High Output LED Batten 30-53W 3CCT with Self-Test Emergency
Linear Batten (commercial/education)
9400
30-53W
3CCT (3/4/5700K)
Emergency
C
Solray Select III 4ft LED Batten 20-34W 3CCT with Self-Test Emergency & Microwave Sensor
Linear Batten (commercial/education)
5200
20-34W
3CCT (3/4/5700K)
Emergency
Microwave ON/OFF
C
Solray Select III 4ft LED Batten 20-34W 3CCT with Self-Test Emergency
Linear Batten (commercial/education)
5200
20-34W
3CCT (3/4/5700K)
Emergency
C
Barracuda IV 4ft 21-36W 3CCT Non-Corrosive + Self Test Emergency
Linear Batten (Industrial)
Industrial
5800
21-36W
4000/5000/6500K
No
Emergency
Standard
C
Barracuda IV 5ft High Output 31-55W 3CCT Non-Corrosive + Self Test Emergency
Linear Batten (Industrial)
Industrial
8900
31-55W
4000/5000/6500K
No
Emergency
Standard
C
Gemini Select 90/113/137/161W Wide Beam
Low Bays
90-161W
4000K
DALI (Optional)
Emergency (Optional)
PIR (Optional)
Standard
C
_1000px.png)
Barracuda Xtreme 2ft 10-17W 3CCT Non-Corrosive
Linear Batten (Industrial)
Industrial
2500
10-17W
4000/5000/6500K
No
No
C
Barracuda Xtreme 6ft 36-64W 3CCT Non-Corrosive
Linear Batten (Industrial)
Industrial
10100
36-64W
4000/5000/6500K
No
No
C
Barracuda Xtreme 5ft High Output 31-55W 3CCT Non-Corrosive
Linear Batten (Industrial)
Industrial
8900
31-55W
4000/5000/6500K
No
No
C
Barracuda Xtreme 4ft 21-36W 3CCT Non-Corrosive
Linear Batten (Industrial)
Industrial
5800
21-36W
4000/5000/6500K
No
No
C